Macros
A macro is a shortcut for executing several commands with fewer keystrokes. By now, you may have realized that there are several commands that you repeat and use all the time. You may be wishing that you had a menu option just for those sequences of commands.
A macro can do exactly that. Using a special key sequence, you can put the Design Assistant in learn mode, where it will memorize each keystroke as you type. Then, when you are all done teaching the Design Assistant your keystrokes, you can play them back at any time. When the Design Assistant plays back your keystrokes, it behaves just as if you had typed them in yourself at the keyboard (only much faster).
Usage
Macros record keystrokes and many mouse clicks within the Design Assistant but will stop recording when certain dialog boxes are encountered. As a general rule if the Design Assistant screen disappears as a dialog box appears any key strokes or mouse clicks within that dialog will not be included in the macro and it will stop recording.
Macros are also Menu and column sensitive. If you record a macro with the cursor starting in the Amp column of the Design menu and then run it with the cursor in the Coupler column you may get some odd results. This can be avoided by making sure the cursor is always in the same column when starting a macro in the design mode.
Starting Column
It's recommended to always start with the cursor in the FTG | HC | CAB | LV group of columns. This will help ensure your macros always have the same starting point and will be less prone to errors when executing.
Macro Manager
A macro can be assigned from anywhere in the Design Assistant. Typing * * or selecting Tools ➡ Macro Options... calls up the Macro Manager window.
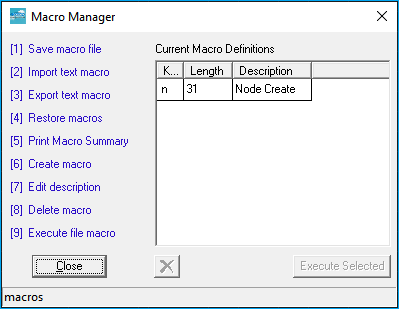
1 Save macro file
Updates the macro file currently loaded in memory with any new macros that have been created during this Design Assistant session.
2 Import text macro
Reads a text file \*.0ab into memory and assigns it to the selected keystrokes. This makes it possible to write a macro outside of the Design Assistant and import it or to edit existing macros and read them back in.
See below for guidelines on creating or editing text macros.
3 Export text macro
Exports an existing macro created from within the Design Assistant to a text file that can be edited and imported back into the Design Assistant for later use.
4 Restore macros
Restores any macros deleted since the last save of the macro file.
6 Create macro
Used to create new macros. See below for detailed instructions on creating macros.
7 Edit description
Allows editing of the text description of the macro.
Edit Description
This edits the text description only; it is not used to edit the macro keystrokes themselves.
8 Delete macro
Press 8 and the hot key for the macro you wish to delete.
9 Execute file macro
Reads and executes a text macro without assigning it to a keystroke or saving it to the macro file.
Create Macro
Take the following steps to create a macro:
- Press 6
Create Macro - Press the key you wish to assign the macro to. This is the "Hot Key" used to run the macro.
- Enter a description
- Press keystrokes to record
- Press * to terminate macro recording
- Press * * to open the Macro Manager
- Press 1
Save Macro File
Design a Macro
To design a macro, press 6 Create Macro, then the key that you wish to assign the macro to (that is, the key you want to be able to press to run the macro). Then, enter a description of the macro (under 60 characters), followed by the keystrokes that you wish to record. When you are done teaching the Design Assistant your keystrokes, press the * key to end the macro recording. Once the Macro has been recorded and tested, press * * again and select 1 to save the Macro file. If the Macro file is not saved, the Macro is assumed to be temporary and will be deleted when the Design Assistant shuts down.
Playback Macro
To play back a macro, press the * key, followed by the key ("hot key") that the macro was assigned to. You can also select
Delete Macro
To delete an existing macro, select 8 from the macro function window then press the key that corresponds to the macro that you wish to delete. For example, if you had assigned a macro to the 1 key, press 8 from the macro function window followed by the 1 key. To make this deletion permanent, you will then need to save the macro file to disk. To obtain a printout of your macros, number of keystrokes, and text descriptions, go to Macro summary in the Print menu.
If you have defined some macros and unfortunately assigned a macro to a key that you had previously defined as having a different macro, you can restore the macro file from disk. This will erase any macros you have created since the last time you performed the save macro file function. From the Macro Function window, select 4 to restore the macro file. Macro files may be handled in a way similar to Status files, and like status files, they will have a .0ab extension. You can set up a macro file with any filename you wish by using the /m command line option. If you save your macros without having set up a specific filename with /m, your macros will be saved to a file called MACROS.0ab. See Chapter 2: Software InstallationsectionCommand Line Optionsfor more information.
Text Macros
It is possible to export any existing macro to a text file (press 3 followed by a text name and the hot key) or write a new macro in any text editor. While it is possible to write a macro in a text editor, this is not a common practice because it is usually much easier to simply record the desired keystroke from within the Design Assistant. Most commonly, the text macro capability is used only to edit existing macros that are extremely long and would take a while to recreate.
Create/Edit Text Macro
While creating or editing text macros, use the following guidelines:
Ordinary printable characters (for example, 1, 2, or a) are represented by the appropriate character.
Other keystrokes are represented as the following:
Up Arrow [UP]
Down Arrow [DN]
Left Arrow [LS]
Right Arrow [RS]
Back Space [BS]
Tab [TB]
Page Up [BP]
Page Down [NP]
Enter [CR]
Exit [EX]
Insert [INS]
Delete [DEL]
Home [HM]
End [ND]
Function keys [F1] through [F12]
Important
- Macro codes are not case sensitive
- A macro can be written on one line or spread out over multiple lines
- Leading spaces will be read and included in the macro.
- If a macro is given a text description, it will appear in square brackets with a colon following the opening bracket
[: description]
Macro Ideas
This section has been moved with step by step instructions in our Design Assistant macro guide.
A macro can be assigned to any key on the keyboard, and keys that can be used with the control keys Shift, Ctrl, Alt. Shift q, therefore, can have a macro that is different from an (unshifted )q, and Control q and Alt q can also have their own macros.
Caps Lock
If you press the Caps Lock key, this switches you from the unshifted macro keys to the shifted macro keys for all letter keys.
The macro possibilities are astounding. As you work with the Design Assistant, you will note how many keystrokes are always repeated, and you will find easier ways of performing repetitious tasks. The macro feature of the Design Assistant is there to ease your operation of the program. Efficient use of this feature can accelerate your use of the program and make it a little easier to understand and operate.
Batch Macros
Most macros are designed to run on the design network currently loaded in the program. There is, however, some macros that you may wish to run on a large number of networks, for example a Single network BOM. That's what the Run Batch Macro command allows you to do. Simply record the macro for one network and use the Batch Macro command to run it on multiple networks. Select Run Batch Macro from the Tools pull-down menu.
Use the Browse button to browse for the folder containing the networks you want to run the macro on. Select the networks from the Available Files and add them to the Selected Files and click OK.
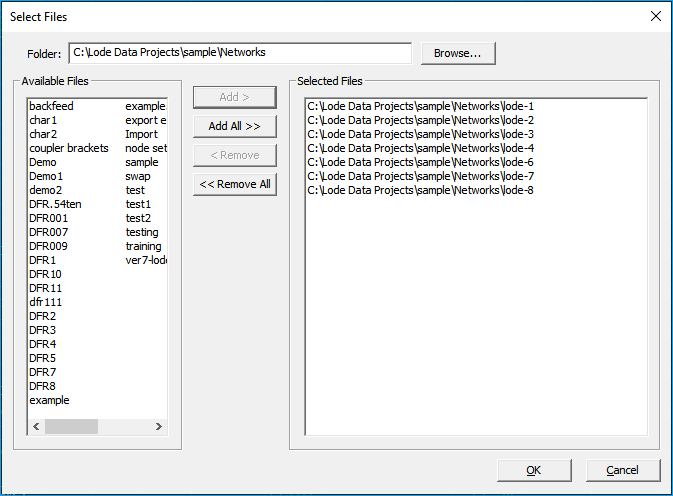
Then select the Macro you want to run from the Available Macros list. Keep in mind that some macros really aren't meant to be run in a batch mode and might do some odd things to your networks. It is recommended that you backup your network files and test the macros to verify that there are no problems caused by running a macro on them.