FAQ
Frequently asked questions regarding Lode Data Corporation software. If you would like to see something added to this list or you could not find what you are looking for please contact Lode Data Support.
Fiber Module
How much does the Fiber Module cost?
Fiber Module Cost
You can find pricing for our software at our Pricing page.
The Fiber Module is $2,600 USD per seat. The Fiber Module requires a yearly renewal.
The Fiber Module is an add on program for the Drafting Assistant. You must also purchase The Drafting Assistant if you do not already own it
I am receiving an error when trying to run a trace report in the Fiber Module.
Failed with error = 5
The Error is:
Unable to copy template file C:\PROGRAM FILES\LODE DATA CORPORATION\DRAFTING ASSISTANT\**VERSION**\Lode.dwt to C:\PROGRAM FILES\LODE DATA CORPORATION\DRAFTING ASSISTANT\**VERSION**\Traces\**TEMPLATE**.dwg, failed with error = 5
Solution
The user needs full read/write permissions to the directory listed in the error C:\Program Files\Lode Data Corporation.
- Open Windows File Explorer and browse to the
C:\Program Files\Lode Data Corporationdirectory. - Right click on the Lode Data Corporation folder
- Select Properties
- Click on the Security tab
- To change permissions click edit
- Select the USERS from the Group or User Names section
- Under permissions select Allow Full Control
View GIF of steps
Unknown Command
Unknown Command
An UNKNOWN COMMAND error indicates that:
- Oracle Client and/or Oracle ODAC is not installed
- The user does not have the proper permissions
Solution
- Install the Oracle Client or re-install
- Give the user full read/write permissions to the
C:\Program Files\Lode Data Corporation
See the Drafting Assistant Permission Errors section to resolve issue #2.
Design Assistant
How much does the Design Assistant cost?
Design Assistant Cost
You can find pricing for our software at our Pricing page.
The Design Assistant is $5,500 USD per seat.
How much is it to update my Design Assistant to the latest version?
Update Design Assistant
You can find pricing for our software at our Pricing page.
It depends on how old your Design Assistant software is.
First, find the date of your key.
| # of years old | Price per unit |
|---|---|
| 1-2 | $1,100 |
| 2-3 | $2,200 |
| 3-4 | $3,300 |
| 4-5 | $4,400 |
| 5+ | $5,500 |
How do I fix orphaned branches?
Fix Orphaned Branches
This is a legacy error and should no longer occur in modern versions of The Design Assistant. The error will still occur however when opening a legacy network file (.9) where the branches were deleted improperly.
- Go to Entry Mode -
Select Mode --> Entry -
-1 JUMP Jump to the branch number that does not have a starting parent branch
If the branch listed in the error is branch 5 then use the -1 JUMP command to go the begging of that branch which would be 5.1
-
Option 1 - Delete the branch -8 DelBr. Chances are the information is no longer needed in this branch and you can delete it.
-
Option 2 - Give the branch a starting location -5 ChBrSt. Use this option if you need to retain the information in the branch.
Give the branch a starting point using the -5 ChBrSt (change branch start) command. Giving the branch a starting or parent branch of 1.1 for example will place the branch at the beginning of the network.
Place the branch at a location where you can remember so that you can either delete the branch or
Fix orphaned branches GIF
Control File BOM is missing selection arrows
Control File BOM
This is a legacy error that occurs when the user has 2 monitors. The Control File BOM window does not display the file selection arrows when the window is on the secondary monitor.
Solution
Move the Control File BOM window to the primary monitor. The arrows may not display immediately. Close the window and try to run the Control File BOM again with the window on the main monitor.
This has been resolved in Design Assistant version 10.10
How to change the font size
Font Size
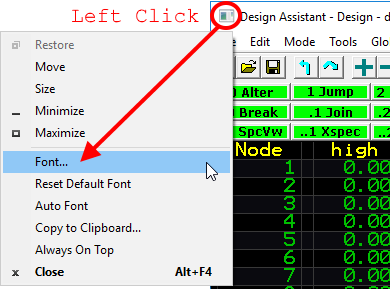
To change the font size left click on the Design icon in the upper left hand corner of the program. From there you will see a list of options that include font. Click on Font and change to the desired Font, Style, and Size.
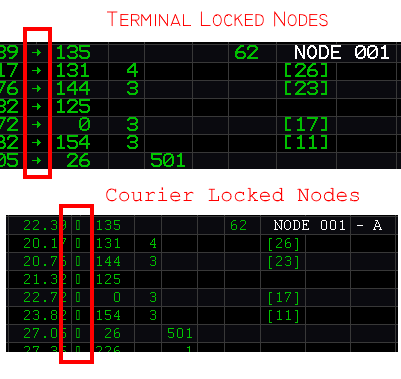
The Design Assistant is best viewed using the Terminal font. Using other fonts may cause items to slightly change. For instance, using the Courier font will display a locked node as a square rather than an arrow.
How to save to a previous version
Save to a previous version
It is recommend that you backup all your files before you start the conversion process in case you accidentally overwrite the wrong file. This process must be done manually each time you want to save back to a previous version format.
File types that end with numbers (.1, .2, .3, .4, .5, .9, etc) are no longer supported
How to save network (ntw) files
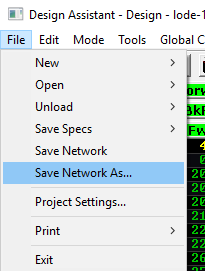
To save to a previous version select File--Save Network As..
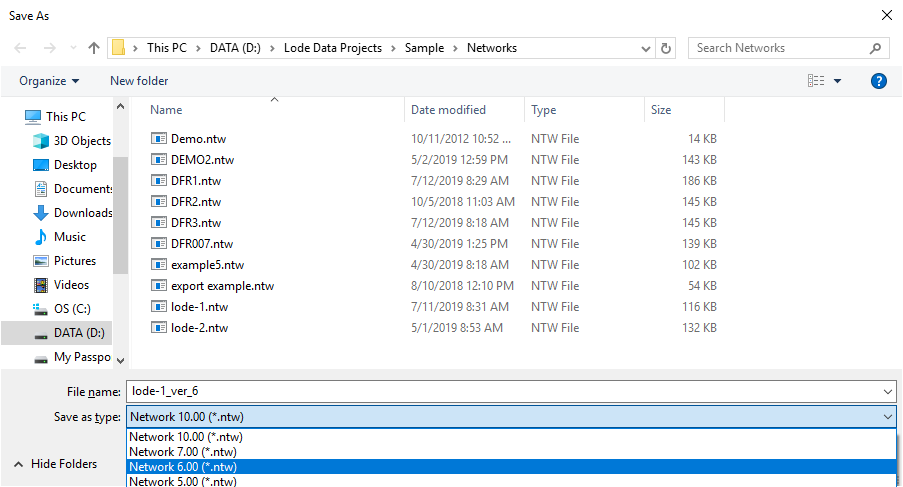
Type in a new name or select the existing file name that you currently have open. I recommend saving it with the version in the name to avoid any problems overwriting existing files. For example I'll save lode-1.ntw as lode-1_ver_6.ntw if saving down to version 6.
Keep in mind that you are saving the current open network as another file. Selecting a existing file could overwrite an existing network with the current network you have open.
How to save spec files
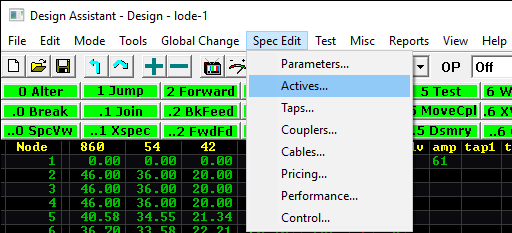
To save spec files to a previous version select the spec file type you wish to save from the Spec Edit menu. In this example we will select the Active Specs (atv).
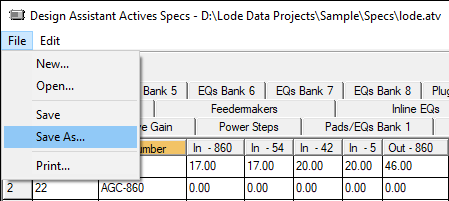
From the Spec Edit--Actives specs select File--Save As...
Then select the version you want to save your specs back to from the file type pull down and save.
Rename the File Name with the version you're saving back to so you don't accidentally overwrite the existing file. Then select the version to save back to under Save as type.

How to open legacy spec files
Open legacy files
You can open legacy spec files *.1, *.2, *.3, *.4, *.5, *.9 directly from the Spec Edit menu.
- Select
Spec Editpull down - Select the type of spec you want to open ie
Parameters - Select the
Openicon 📂 - Browse to the directory where your legacy files are located
- Select the
File Typedropdown (Next to theFile Namefield) - Select the File and Open
- Select the
Saveicon 💾 -
Repeat for all other legacy files
Network files (*.9)
Network files need to be opened from the
FileOpenNetworkmenu or by using the 📂 Open Network Icon
Drafting Assistant
How much does the Drafting Assistant cost?
Drafting Assistant Cost
You can find pricing for our software at our Pricing page.
The Drafting Assistant is $3,500 USD per seat.
How much is it to update my Drafting Assistant to the latest version?
Update Drafting Assistant
You can find pricing for our software at our Pricing page.
It depends on how old your Drafting Assistant software is.
First, find the date of your key.
| # of years old | Price per unit |
|---|---|
| 1-2 | $700 |
| 2-3 | $1,400 |
| 3-4 | $2,100 |
| 5+ | $3,500 |
How do I load my Drafting Assistant and Fiber Module ribbon/toolbars?
Ribbon/toolbars
We no longer supply toolbars however you can create an load your own using this guide from AutoDESK
To load our products ribbon:
- Type
CUILOADinto the AutoCAD command line - Load/Unload Customizations - Select Browse
- Browse to
C:\Program Files\Lode Data Corporation\Drafting Assistant\\**your_version**\Support - Select the LodeFiber.cui file (open)
- Select Load
- Select Browse
- Select the DraftingAssistant.cui (open)
- Select Load
- Select Close
Load customizations GIF
Unable to Install Drafting Assistant / Unable to locate AutoCAD
Unable to install Drafting
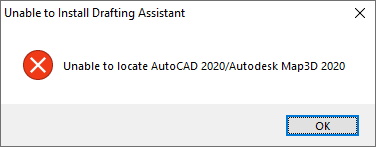
This error will occur in two situations.
-
The user is trying to install a version of the Drafting Assistant for the incorrect version of AutoCAD.
Verify that you've downloaded the correct version of The Drafting Assistant for the correct version of AutoCAD.
-
The Drafting Assistant was installed under a different profile then the end user. For example the Domain Administrator account was used to install AutoCAD and The Drafting Assistant. When the user logs into their profile they will receive the "Unable to locate AutoCAD" error.
When installing AutoCAD under the a different profile than the end user the Administrator must run AutoCAD's secondary installer before installing The Drafting Assistant. To run the secondary installer, log in under the user's profile and double click on the AutoCAD icon. After the installer finishes launch AutoCAD to verify the installation was successful.
You can then install The Drafting Assistant product.
Permission errors
Permission errors
Permission issues can be tough to track down. A common symptom that permissions may need to be set is when AutoCAD opens but The Drafting Assistant commands do not work. Below are some steps to troubleshoot and resolve the issue.
Steps
-
Open the AutoCAD command line and look for errors immediately after opening the program.
"lodegis
.arx cannot find a dll or other file that it needs." Unknown
command"<command>". Press F1 for help. -
Verify the user has full read/write permissions to the following directories and sub-directories
C:\Program Files\Lode Data Corporation\Drafting AssistantC:\Program Files\Autodesk\AutoCAD <version>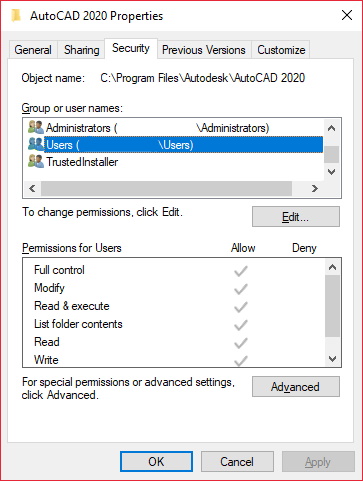
-
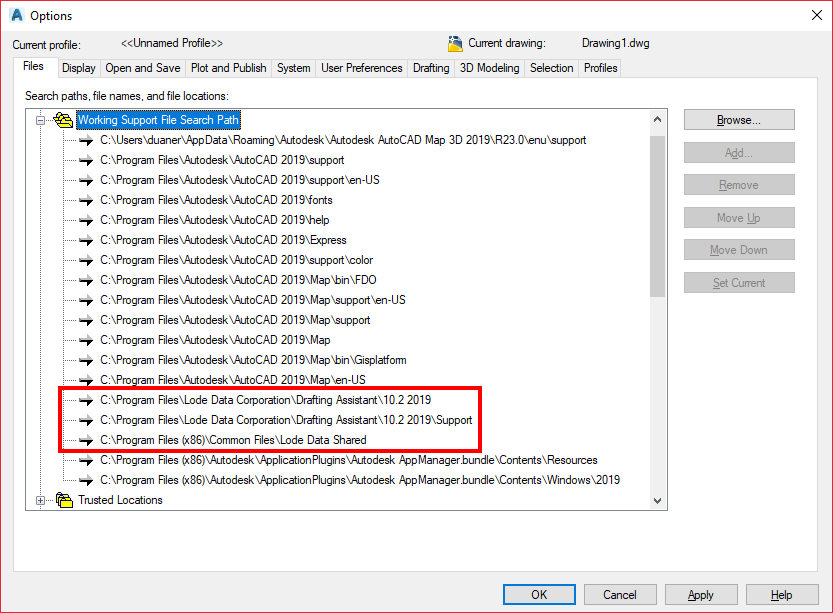
Verify AutoCAD options populated with the Lode Data directories
Note
You may not have the
C:\Program Files (x86)\Common Files\Lode Data Shareddirectory. If the directory doesn't exist on your system you can ignore it.-
Set the Support File Search Path from the AutoCAD
optionsmenu underFilestab.The AutoCAD
optionsmenu can be found by typingOPTIONSon the AutoCAD command line. You could also select theoptionsmenu by clicking on the large A (AutoCAD icon) in the upper left of AutoCAD and selectingOptions. -
Add the following directories:
C:\Program Files\Lode Data Corporation\Drafting Assistant\<version folder>C:\Program Files\Lode Data Corporation\Drafting Assistant\<version folder>\SupportC:\Program Files (x86)\Common Files\Lode Data Shared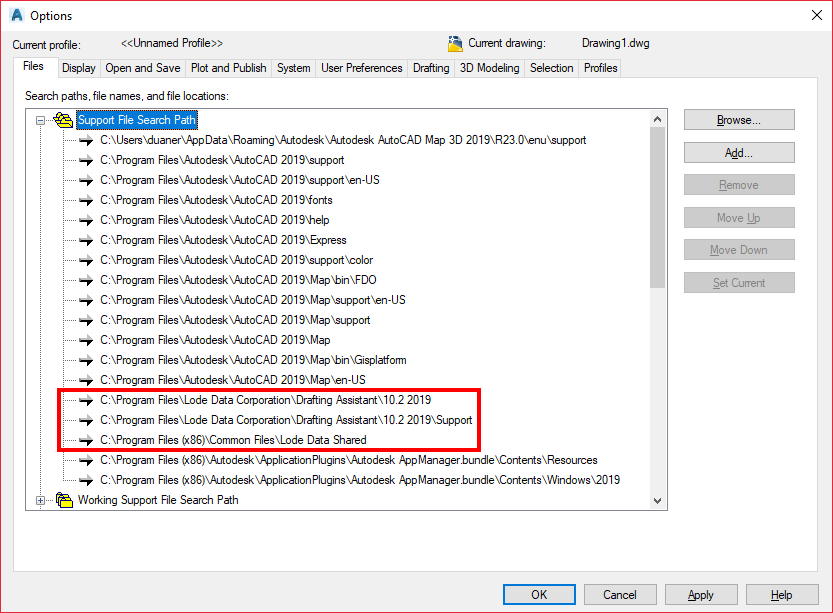
Repeat for Work Support Path
Trusted Locations
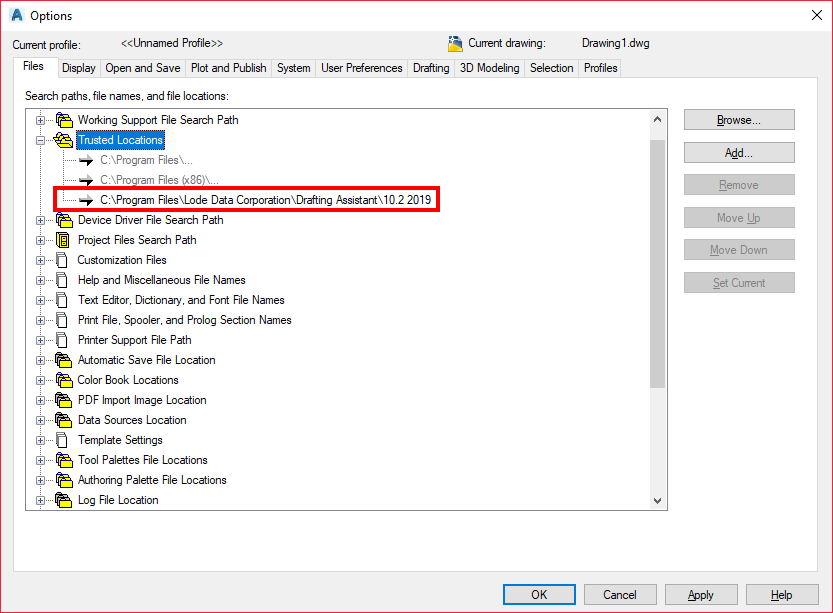
-
-
Close and relaunch AutoCAD/Drafting Assistant
USB keys
What are USB keys for?
Keys Explained
Lode Data currently utilizes a hardware lock (USB keys/dongles) as our software licensing management. The USB device you receive from us when you purchase our product(s) is your software license.
The USB keys are non-refundable and non-replaceable in the event the USB key is lost, stolen or otherwise damaged.
The USB keys are non-transferable.
The USB keys can be combined to host all our software products onto one device or products can be broken up to individual devices.
Does Lode Data offer other forms of licensing?
Licensing
We offer a network licensing model for our Design Assistant product only. This eliminates the use of the USB devices.
The network license is offered to customers with 20+ users and requires a yearly renewal.
How do I update my Lode Data USB key?
Update key
To update your USB key/dongle take the steps below. The key date will update to reflect the date according to your purchase agreement.
For a more in depth explanation of our how our USB keys work with the ReadKey.exe program please see this FAQ.
Requirements
- Lode Data Design, Drafting, or Fiber Module must be installed
-
ReadKey.exe program -- Installed automatically when installing Lode Data software
Default location:
C:\Program Files (x86)\Lode Data Corporation\Utilities -
USB Key
Subupdt.encfile
Important
- Only one USB key can be attached at a time to run the update
- Attach the USB key directly the the USB port of your computer. Using a USB hub may cause issues with the key
Steps
- Remove all Lode Data USB key/dongles
- Install the latest version of Design, Drafting or Fiber Module
- Save the
subupdt.encfile you received from Lode Data to the desktop - Attach the USB key to be updated Windows should find the drivers automatically if you successfully installed the software
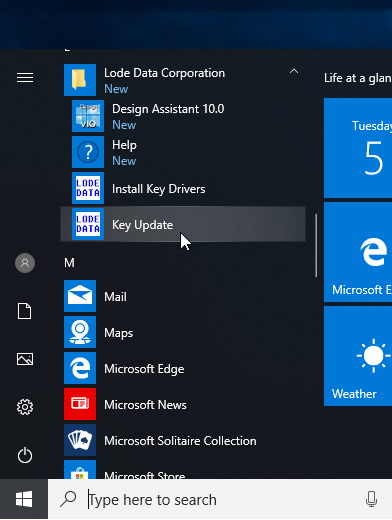
- Select
 browse to Lode Data Corporation.
 -
Select Key Update
-
Highlight the serial number to see the products associated with the key
-
Select Key Update
- Select Refresh to see updated key information
The key will reflect the new date. Launch the new version of Design, Drafting, or Fiber
Key Update GIF
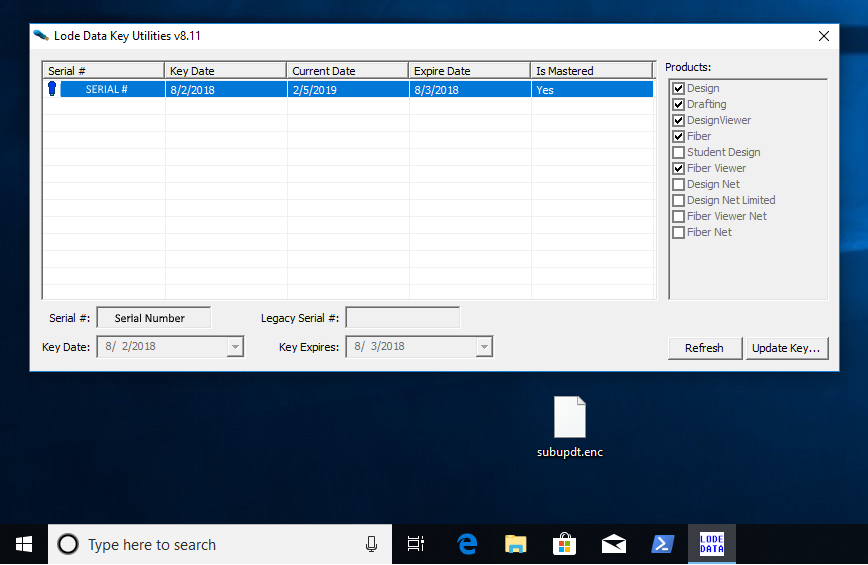
In the example provided, we updated the key date from 8/2/2018 to 1/31/2019. We also set the Expire Date form 8/3/2018 to 5/1/2019.
How do I find my serial number or key date?
Key date-Serial Number
The process to find your serial number or key date is the same. You'll need to have Lode Data Software installed to access the ReadKey.exe program. If you do not have access to our software contact Lode Data Support and we can provide you with the ReadKey.exe.
Requirements
- Lode Data Design, Drafting, or Fiber Module must be installed
-
ReadKey.exe program -- Installed automatically when installing Lode Data software
Default location:
C:\Program Files (x86)\Lode Data Corporation\Utilities -
USB Key attached to computer
Steps
Open ReadKey.exe program
- Browse to the default location
C:\Program Files (x86)\Lode Data Corporation\Utilities\ReadKey.exe
or
- Select
 browse to Lode Data Corporation.
 -
Select Key Update
-
Serial number is listed #1
-
Key Date is listed #2
Read Key explained
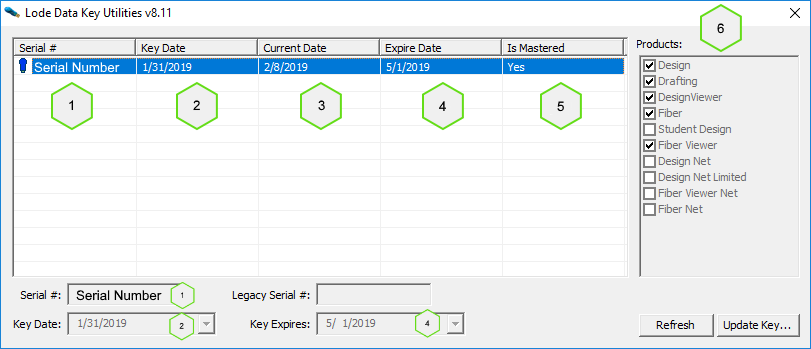
ReadKey
The readkey.exe program is the Lode Data Key Utilities for our software license management tool. Below is an explanation of each field of the program.
-
Serial Number
This is your software license and is non-transferable. It is recommended that your record this number and store elsewhere for your records.
-
Key Date
The key date determines what version of the software you can run.
Example
In our screen shot above we have a key date of 1/31/2019. This means we can run any software version of any of the products checked that have a release date before or on 1/31/2019. Any software that is released after 1/31/2019 will not be accessible with this key.
Using the Design Assistant as an example.
Design Assistant has the following version key dates:
Version Key Date 10.00 5/01/2017 11.00 3/01/2019 Our key in this example will be able to run version 10.00 but will require an upgrade to run version 11.00.
Note
This is a hypothetical, version 11 of the Design Assistant is scheduled to be released later in 2019
-
Current Date
-
Expire Date
Lode Data Corporation has two types of USB dongles. One is a permanent key, the other is a timer key. A permanent key will not display a value in this field. If you see a value here then you have a timer key. The date displayed is when your software license will expire. In the example shown the key will expire 5/1/2019 and I will no longer be able to use my software. Timer keys are used for certain products and subscription services that require renewal.
-
Is Mastered
This value will always display YES, if you experience otherwise contact Lode Data Corporation immediately
-
Products
List of products associated with your USB dongle. In order to see the check boxes you must highlight the serial number by left clicking on it.
Refresh
If the serial number or key date does not change after performing a key update then try refreshing the program.
If reading multiple keys, you'll need to refresh the program after removing and attaching another key.
Update Key
Read the How do I update my Lode Data USB key? section for further information
The software serial number is needed when requesting technical support, performing software updates, and general account information.
What is a .LCK file
Lock File
A lock file .LCK is created everytime a user opens a .NTW file. The file is created in the same directory as the .NTW file. A .LCK file will have the same name as the .NTW that is being edited. It is used to prevent another user from opening and editing the .NTW file at the same time.
A user will receive a warning that the file is already opened by another user. Sometimes the .LCK file will persist even if the user has closed the file. In these cases you will need to navigate to the folder that contains the .NTW file and the .LCK file. Delete the .LCK file and you should be able to open the network.
In rare cases this does not resolve the warning error. It may be necessary for both users to close the Design Assistant and re-open the .NTW file. In very rare cases, it may also require a user(s) to reboot their computer.
Common USB key errors
Before trouble shooting the errors below make sure that the USB key is connected directly to a USB port on the computer. Using a USB hub can cause issues with the USB key being recognized by the computer.
Unknown Error 2
- The button is not recognized in the USB device. This occurs when a user connects a USB that does not have a button in it or a button that still has the sticker on it which prevents a metal to metal connection with in the device.
- Will also occur when a user has a new button and is trying to run a readkey utility from an unsupported version.
Solution 1
Make sure a button is in the USB housing. If you are upgrading from an older key, take the button out and make sure there isn't a sticker on it.
Solution 2
Run version 8.11 or newer of the readkey utility.
Unknown Error 5
User is trying to update or run an older version of the ReadKey Utility
Solution
Run version 8.11 or newer of the readkey utility.
Security device not found
A USB device is not attached to the computer or is not recognized.
Solutions
- Attach USB device directly to the computer
- Do not use a 3rd party USB hub
- If a USB key is attached, verify that the device is recognized by Windows in the device manager
- Manually install key drivers guide if missing.
- Try a different USB port to verify the port is not malfunctioning
- Verify USB Housing is not malfuctioning (see below)
If the USB device is not being recognized by the computer and you have verified the issues above than you may have a faulty device. The USB buttons are not prone to failure but occassionally the USB housing may fail. In order to verify the device is faulty you will need a second USB housing.
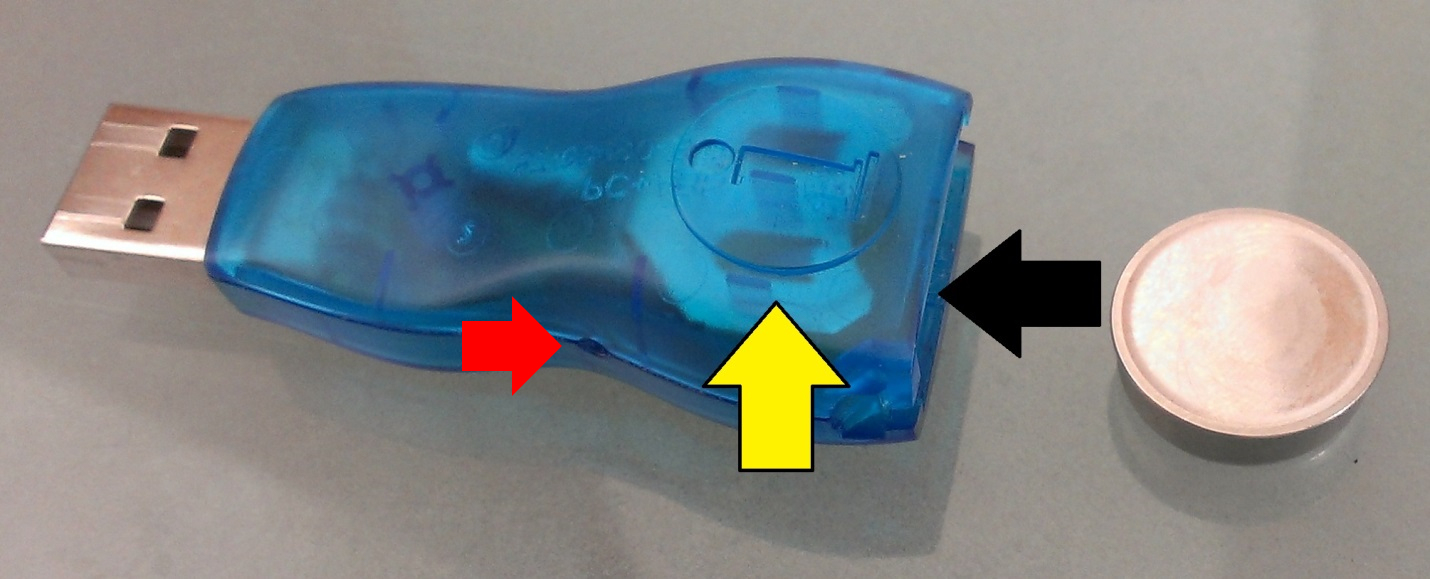
Remove the cap from the device. The button/battery will go in smooth side up as shown. The letter i (yellow arrow) indicates the top of the USB housing. The removal process is the same. If you have trouble removing the button there is a pin sized hole (red arrow) on the side where a paper clip can be inserted to push the button out.
- Open the USB housing (blue USB device)
- Remove the button from the housing. The "button" is the battery looking device inside of the housing
- Place the button in a known working USB housing
- Attach the device to a working machine
- Verify software launches and is working properly with the key
Security device is not mastered for this product
A USB device is recognized and attached to the computer. The error indicates that you are trying to run a product that the key is not designated to run. For example, you have a USB key that is mastered to run The Lode Data Design Assistant. You install and try to run The Lode Data Drafting Assistant. When The Drafting Assistant opens a Security device is not mastered for this product error will appear. The error is telling you that the key is not authorized to run The Drafting Assistant product.
Solution 1
Verify the key is mastered to run the product you installed.
Solution 2
This error usually occurs when users install The Drafting Assistant product but did not un-check the Fiber Module. Your key is mastered to run only The Drafting Assistant and thus the error occurs when the Fiber Module loads. Uninstall The Drafting Assistant and reinstall.
See step 7 of The Drafting Assistant installation guide
You can also ignore the error and proceed with using The Drafting Assistant, however; you will receive the error each time you open the program.