Purpose
The Lode Data Database Utilities was created to assist users who are not familiar with Oracle Database and/or who do not have Oracle Database Administrators on site. The utilities offer a simple way for our users to create backups, export, and import their database.
Tip
The Database Utilities are command line compatible which allows you to write scripts to be used for backup automation.
See step 1 of Create BAT File in the backup section for an example.
Installation
Installing the Lode Data Database Utilities is a straight forward process. The installer will install two programs in the C:\Program Files\Lode Data Corporation\Database Utilities folder.
-
FiberExport.exe
A graphical interface to create an Oracle Database datapump DMP file.
-
FiberImport.exe
A graphical interface to import an Oracle Database DMP file.
Steps
- Unzip the installation file (
setup.exe) to a folder on the server desktop - Right-Click the setup.exe file and run as Administrator
- Next
- Accept license agreement
- Install
- Finish

Usage
When using the DB Utilities you'll need to know the proper users and passwords for the database. These are the passwords you configured in Step 13 - Specify Schema Passwords of the Oracle DB Install.
The exception is that you'll also need the schema user and password. The schema user is normally setup as user = Data.
Tip
Setup and directory where you will save your backup files. In the example we use C:\DMP as our default location. Since virtual machines usually have limited drive storage it would be wise to zip archive the files and move them regularly.
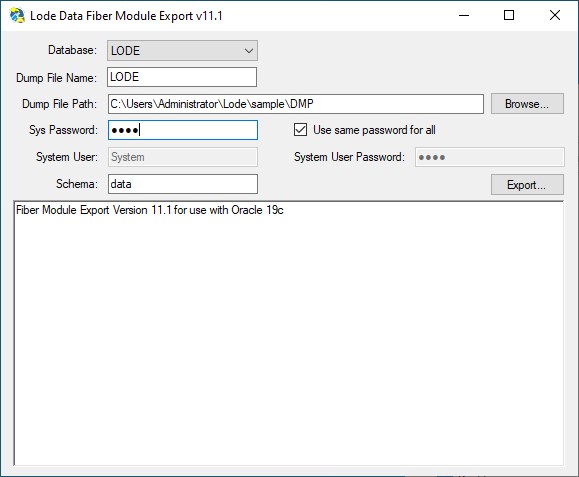
Fiber Module Export
Running the Fiber Module Export program will create an exact copy of your Fiber Module database. This is useful for backups, migration, and providing Lode Data with a copy of your database. The file created is a *.DMP file.
Tip
A typical use case is to create a new database to import the DMP file into. When using a database that already has data in it, you'll need to delete the schema. Typically the schema is data
In the example below we used the same passwords (lode) for all of the database users Sys and System that we created in Step 13 - Specify Schema Passwords. If you assigned different passwords for each user in Step 13 then you would use those instead.
-
Database:
Oracle system identifier (SID) created in Step 8 - Specify Database Identifiers
-
Dump File Name (ex:
expdat.dmp):Default file name.
-
Dump File Path (
C:\DMP):Recommended file path.
-
Sys Password:
Password created in Step 13 - Specify Schema Passwords for Sys
-
Use same password for all:
If you used the same password for all users during setup you can check this box to automatically populate the rest of the export dialog box.
-
System User:
Enter User name of System. It's highly likely System is the default user name unless you changed it in setup.
-
System User Password:
Password created in Step 13 - Specify Schema Passwords
-
Schema:
Schema created on database setup. The default user id is
data. -
Status Window:
The status window will display text while the export program is running. A
DOSwindow will also open which will display the export log as the program executes the export.
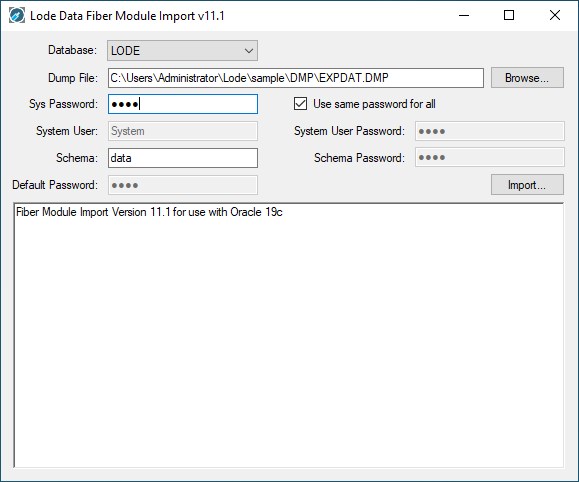
Fiber Module Import
Running the Fiber Module Import program will import an Oracle Database DMP file. This can be useful to restore corrupt databases from backup or database duplication.
The fields for the Fiber Module Import program are the same as the Fiber Module Export program except you will need the schema password.
-
Database:
Oracle system identifier (SID) created in Step 8 - Specify Database Identifiers
-
Dump File:
Browse to the location of the DMP file.
-
Sys Password:
Password created in Step 13 - Specify Schema Passwords for Sys
-
Use same password for all:
If you used the same password for all users during setup you can check this box to automatically populate the rest of the export dialog box.
-
System User:
Enter User name of System. It's highly likely System is the default user name unless you changed it in setup.
-
System User Password:
Password created in Step 13 - Specify Schema Passwords
-
Schema:
Schema created on database setup. The default user id is
data. -
Schema Password:
Password created in Step 13 - Specify Schema Passwords
-
Default Password:
Password created in Step 13 - Specify Schema Passwords
-
Status Window:
The status window will display text while the export program is running. A
DOSwindow will also open which will display the export log as the program executes the export.
Log Files
A log file (TXT) will be created after the import or export program is finished running. The log file will be in the same directory as specified in the Dump File directory.